I have to say I love me some Christmas time, guys. As much as I hate the cold, the busyness at the malls once November hits, and the “ohmygoditsallover” that seems to hit me at midnight on December 25th, I live for the holidays and the sweet traditions that mean so much to me. The other day I broke out the Balsam Pine candles so our home can smell like an entire pine forest and I’ve been doing small happy dances through the Christmas section at Hobby Lobby. All of those ornaments and decorations are enough to give a girl heart palapations. So for all of you holiday lovers, and lovers of the sweetness that Christmas brings, this is for you.

{Step 1} Make sure you have all the supplies needed. Pictured is everything I used like small latch-top, seal proof jars from Hobby Lobby, hot cocoa mix, mini marshmallows, some pink linen fabric, mini candy canes, my hot glue gun, Ghirardelli chocolate peppermint squares, my shiny scissors and the prettiest little labels designed and printed by one of my lovely friends Ashley of Lemon and Lavender. Try to refrain from eating all of the needed chocolate peppermint squares.

{Step 2} Scoop equal amounts of cocoa mix into each jar until about halfway full. I used two canisters of cocoa mix to fill the five jars I have so if you need to make these favors on a larger scale I suggest using smaller containers. Once your halfway full, place three chocolate peppermint squares on top of the hot cocoa mix. The chocolate really isn’t needed to make a cup of hot cocoa but man are these things good. And your friends will thank you when they find these little treats hidden inside.

{Step 3} Again, refrain from eating all the mini marshmallows. And use a spoon to scoop marshies until the jars are full.

Like so!

{Step 4} To make the pink linen covers, eye ball and cut out a square piece of fabric that will be large enough to cover the opening of your jars. Cut it out and fold it in half. Draw a semi circle with a pencil or white pencil crayon and cut out to make your circle. Place over the opening of the jar and close the lid and latch to create an air tight seal. See how fun this part is?

The fabric will ruffle slightly once it’s sealed in place which let’s be honest, looks pretty dang cute, no?

{Step 5} Add your “Perfect Mix” labels to the jars. I decided to tape the ones Ashley sent to me, on the sides of the jar over top of where the hot cocoa sat so they would stand out. I was sort of bummed out though because I really wanted to show off the backs of the tags where there are Kate Spade ish type stripes (look how cute these things are, below). I am telling you if you need fun paper products Ashley is your girl. You can check out more of her work here and visit her blog over here too.

Pretty pretty.

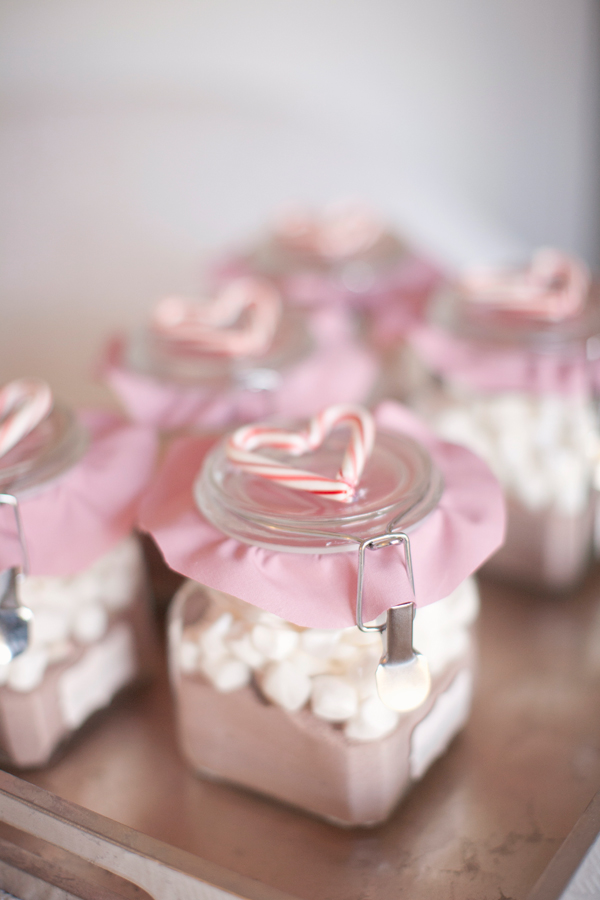
{Step 6} To make the candy cane hearts for the tops of the jars, hot glue gun together two small candy canes facing in towards one another. I have seen edible versions of these hearts made with melted chocolate in place of glue but I wanted these just to sit on top of the jars so I was a-ok with gluing my canes together. Then I glued the hearts to the tops of the jars.

I just love how these turned out :) so pink and pretty and soft of course!

But wait. I know you’re all thinking “Rhi, Rhi, Rhi, what is this Perfect Mix you speak of?” And well to be honest it could be the perfect mix of two people falling in love and getting married and having these hot cocoa favors at their wedding celebration. Or it could be the perfect mix of hot cocoa and a dash of a little thing I like to call yummy in a bottle. Aka kahlua. I’ll go with the latter.

The Perfect Mix. I hope it makes you feel all warm and fuzzy inside this year during the holidays! Much love, beauties xoxo
